Russian Join Crochet
Russian Join Crochet - Watch this video, get some free crochet patterns and practice! The russian join also works well when you are making your own yarn cakes with a yarn ball winder. They require neither knots nor weaving. If you’re switching colors at the end of the row, keep knitting/crocheting until you reach the end of the row, then cut your yarn, leaving a tail that’s a few inches long. Web stop weaving in your yarn tails! Web however, two joining methods rise up above the rest. All of my patterns and tutorials. Eliminate yarn tails and weaving in with this method! The only thing i hate about crocheting is having to weave in yarn ends. It does leave a small amount of bulk, but it’s hardly noticeable — especially compared to other types of joins in knitting and crochet. In this post i’ll show you how to work the russian join, the most versatile of the two joins. Learn to join your yarn. Rip back 4 or 5 stitches and work your russian join, then reknit or crochet the stitches that you ripped out. This is a great method to join yarn when knitting, as well as for joining crochet yarn. Web the russian join is an interesting way to add new yarn to your project that doesn't create knots or new ends to weave in. In fact, if you talk to crocheters about it, oftentimes you’ll discover that weaving in the ends is their least favorite part of their projects!. Web sometimes called the invisible join, or the russian knot, this is a fantastic technique to join new yarn quickly and without fuss. Web ready to take your crochet and knitting up a notch with the russian join? I tend to like this type of join when you are adding a new ball of yarn, not. Russian join tutorial for crochet and knitting. And the best thing is that’s it’s secure and almost invisible! Web when to use the russian join. The russian join is a great way to connect two ends of yarn so that the join is as seamless as possible in your next project. Web sometimes called the invisible join, or the russian knot, this is a fantastic technique to. Take a look at how to. Web this post shows how to join two ends of yarn using the russian join. The russian join also works well when you are making your own yarn cakes with a yarn ball winder. It’s versatile and creates a seamless yarn join that can be used for knit or crochet, knitting in the round. The russian join is great to use if you are no changing colors with your yarn. If you’re switching colors at the end of the row, keep knitting/crocheting until you reach the end of the row, then cut your yarn, leaving a tail that’s a few inches long. Eliminate yarn tails and weaving in with this method! Learn to join. The biggest advantage to the russian join is that you do not have any ends to weave in. With the russian join, you’re able to join any kind of yarn fibre together. This tutorial will show you how. The russian join is a clever technique used in both crochet and knitting projects. Crocheter, mom, wife, and tea addict. Web the russian join: Web the russian join is one of the absolute best ways to join yarn due to it’s secure hold and invisible finish. If you’re switching colors at the end of the row, keep knitting/crocheting until you reach the end of the row, then cut your yarn, leaving a tail that’s a few inches long. And the. Web ready to take your crochet and knitting up a notch with the russian join? In fact, if you talk to crocheters about it, oftentimes you’ll discover that weaving in the ends is their least favorite part of their projects!. Crocheter, mom, wife, and tea addict. Web russian join is a technique for joining two strands of yarn before knitting. With the russian join, you’re able to join any kind of yarn fibre together. Web the russian join involves working the yarn back through its own plies to keep it in place. Web sometimes called the invisible join, or the russian knot, this is a fantastic technique to join new yarn quickly and without fuss. The russian join is a. Take a look at how to. If you’re switching colors at the end of the row, keep knitting/crocheting until you reach the end of the row, then cut your yarn, leaving a tail that’s a few inches long. Web ♥ watch the magic knot tutorial: Instead, use the russian join to attach new yarn as you go whenever you knit. How do you connect two pieces of yarn without having to weave in tail ends? The russian join is great to use if you are no changing colors with your yarn. Web the russian join is a great method for splicing together yarn. This is a really neat technique that will leave your patterns flawless. Rip back 4 or 5. Skip weaving in ends and stop relying knots with this super easy, beginner friendly method of joining yarn together! The russian join is one of the best ways to join yarn, in my opinion. Learn to join your yarn. The proper tool for completing this is to use either a yarn needle or tapestry needle, which is then spliced and. Web this post shows how to join two ends of yarn using the russian join. Web the russian join allows you to add yarn to the working strand without tying a knot and without leaving ends to weave in later! The biggest advantage to the russian join is that you do not have any ends to weave in. Web in this video you will learn how to crochet the russian join! They are the russian join and the spit splice. In this post i’ll show you how to work the russian join, the most versatile of the two joins. Web however, two joining methods rise up above the rest. It does leave a small amount of bulk, but it’s hardly noticeable — especially compared to other types of joins in knitting and crochet. As enjoyable as it is to crochet and knit, weaving in ends is generally not part of the fun. Web russian join is a technique for joining two strands of yarn before knitting them instead of weaving in the ends afterward. Web learn how to make a knotless russian join with emi harrington. Unless you are knitting a pair of mittens, a hat, washcloths, or something similar, you will most likely need to join balls or skeins of yarn. Web stop weaving in your yarn tails! One of many tips and tricks i have! How do you connect two pieces of yarn without having to weave in tail ends? Web ♥ watch the magic knot tutorial: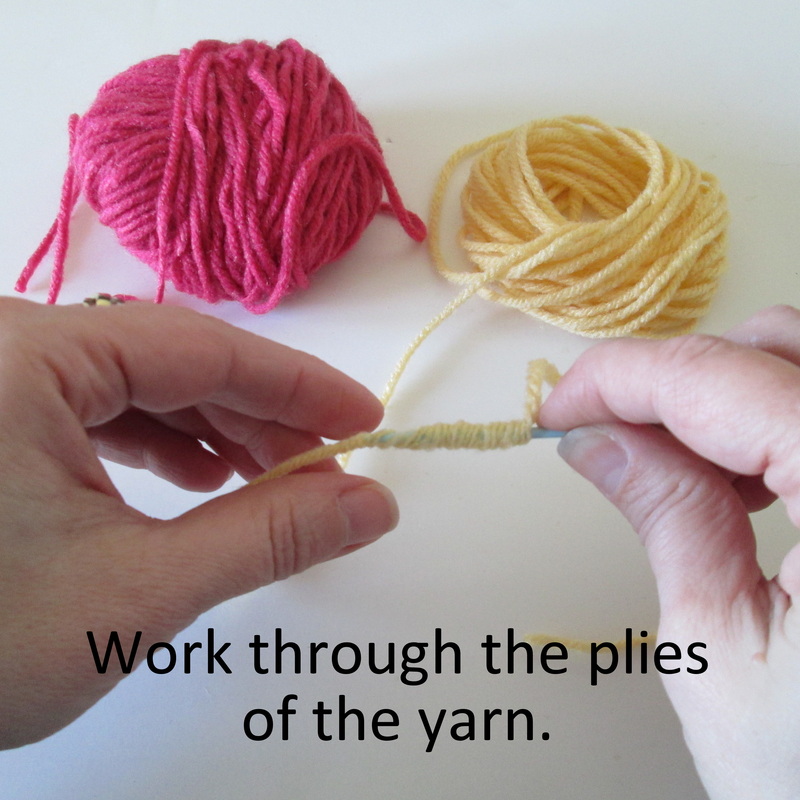
LiaKnits How To Attach Yarn Using the Russian Join

How to Do a Russian Join Crochet Tutorial Stitcherella YouTube

Learn to use a Russian join in your crochet or knitting! Joining yarn

CrochetBasics The Russian Join YouTube

How to Russian Join Yarn for Knitting (and Crochet) Knitfarious

The Russian Join Technique / Crochet Crochet Pinterest Joining
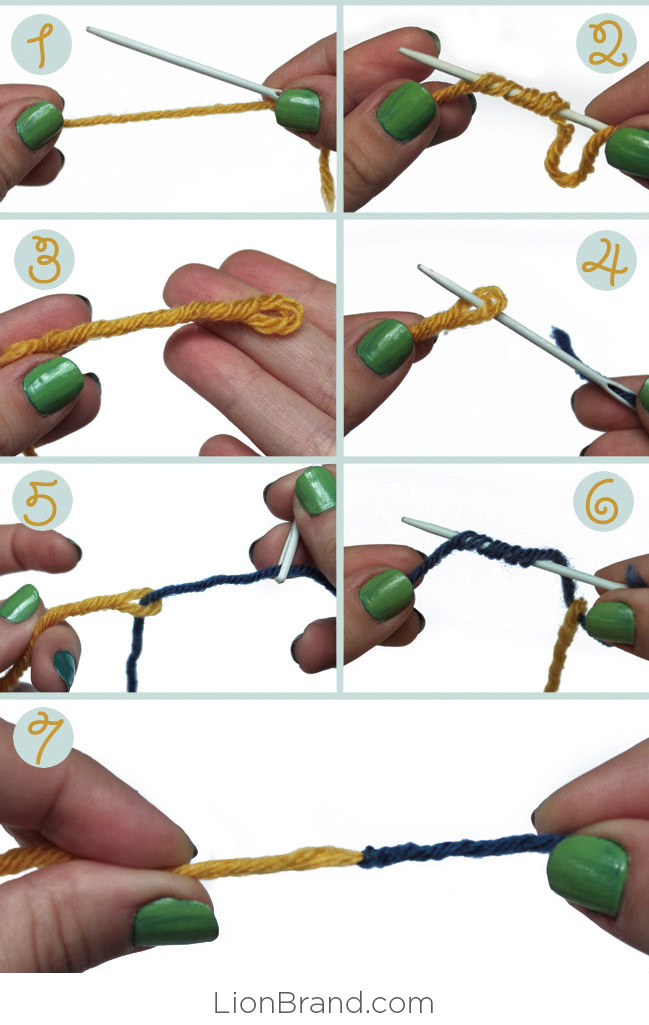
How to Russian Join Yarn in 7 Easy Steps
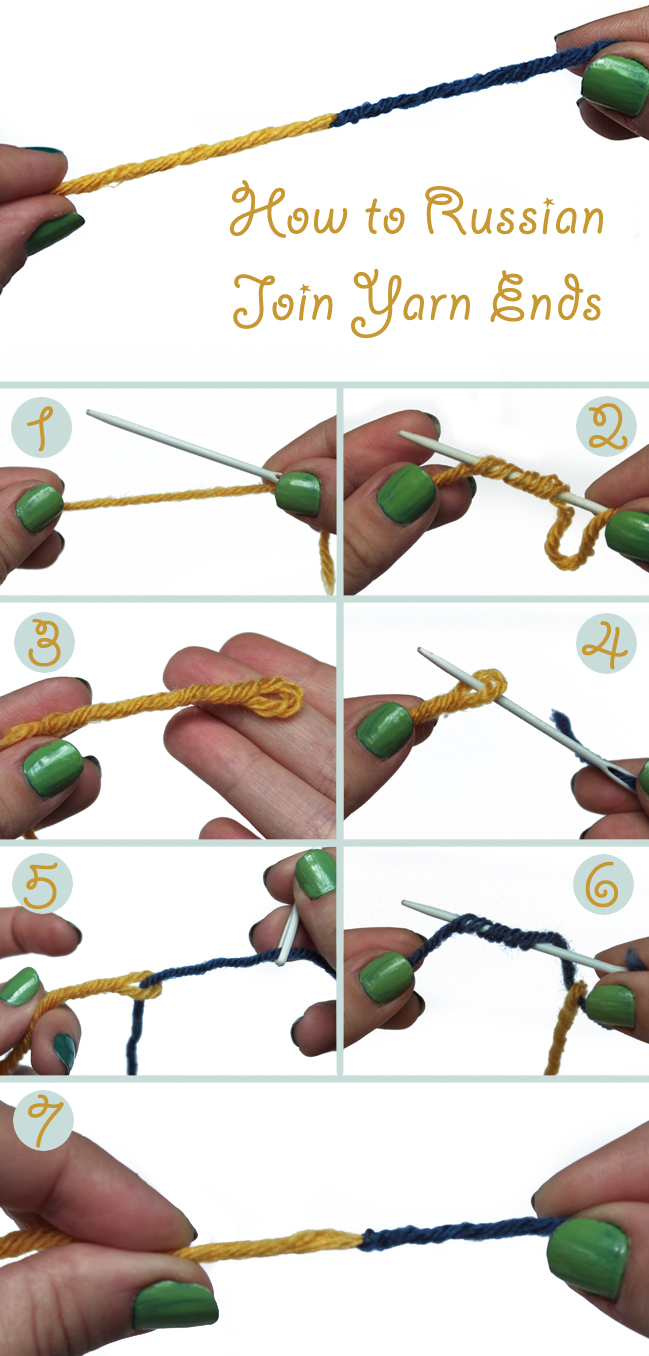
How to Russian Join Yarn in 7 Easy Steps

How to Russian Join Tutorial for Crocheting and Knitting

Russian Join knotions
You Can Use It In The Middle Of A Project To Join In New Yarn Without Weaving In Ends Later, Or You Can Use It To Organize Your Smaller Bits Of Stash Yarn To Create A “Magic Yarn Ball.” It’s A Fairly Straightforward Process, But It Can Be A Bit Tricky To Hold And Navigate With A Tapestry.
I Never Knew There Was A Name For It And I Like The Name.
Rip Back 4 Or 5 Stitches And Work Your Russian Join, Then Reknit Or Crochet The Stitches That You Ripped Out.
I Learned How To Do This When My Mom Showed Me How To Crochet About 40 Years Ago.
Related Post: